ISO/IEC 15416: how a linear symbol is graded
Labelling and regulations Quality and verification Lesson 11 of 12
ISO/IEC 15416 defines the method for measuring the quality of linear symbols: a verifier with standardised lighting (light at 660 nm, except for special materials) scans the symbol along ten paths across the barcode — not a single line, ten, spread over the height of the symbol — and on each path measures the parameters of the standard.
The parameters that are graded
Decode (does it decode according to the symbology?), minimum reflectance (do the bars absorb enough?), symbol contrast (EC, the overall difference between bars and spaces), edge transitions (the sharpness of the bar/space boundaries — the parameter that gives away worn-out printers), modulation (the consistency of widths between the centre and the ends), defects (isolated spots and voids) and decodability (how far the widths deviate from the ideal nominal).
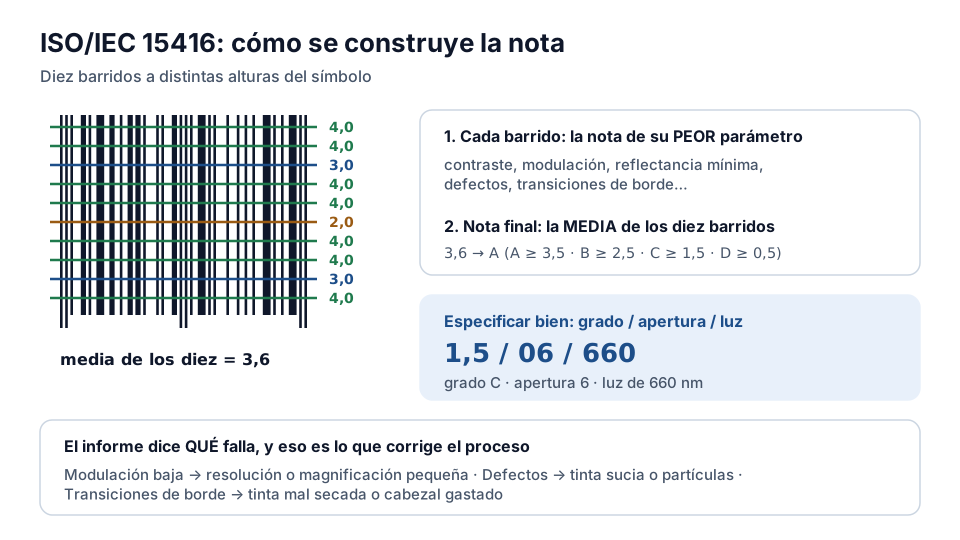
Each parameter is graded from 4 to 0; each path takes the grade of its worst parameter, and the overall grade of the symbol is the average of the ten paths. A single faded strip lowers the grade of the paths that cross it and, with them, the average. That is why an overall A requires a symbol that is consistently good across its whole height — it isn't enough for it to be good in the middle.
The aperture: the detail that invalidates measurements
The standard defines the verifier's aperture according to the magnification of the symbol (aperture reference X): measuring with the wrong aperture gives absurd results — a fine symbol measured with the aperture for a coarse symbol looks better than it is, and vice versa. When you buy or use a verifier, checking the correct aperture for your magnification is the first control.
From the report to the decision
The verification report tells you which parameter fails and where: low modulation points to insufficient print resolution or small magnification; defects, to dirty ink or material with particles; fattened edge transitions, to poorly dried ink or a worn print head. The grade without the diagnosis is a snapshot; the diagnosis is the tool for continuous improvement — and the one that turns quality control into fewer incidents, not more paperwork.
How the grade is built
The verifier doesn't look at the symbol once: it makes ten scans at different heights and grades each one. The grade of each scan is that of the worst of its parameters, and the final grade of the symbol is the arithmetic mean of the ten scans. That is why a localised defect in one strip lowers the grade without failing it, and why two symbols with the same grade can have very different problems.
The scale goes from 4.0 (A) to 0.0 (F). The full report says which parameter limits each scan, and that piece of data — not the grade — is what lets you correct the printing process.
What to require and how to document it
The grade can't be quoted on its own: a correct specification states grade / aperture / wavelength, for example “1.5/06/660”. The aperture is chosen according to the module size, and the wavelength simulates the scanner's light. Two verifiers with different settings give different results on the same symbol, and without those parameters a claim can't be defended.
In the contract with the printer it is worth setting three things: the minimum grade, the measurement settings and the sampling frequency. Without all three, “the barcode has to scan well” means nothing enforceable.
Exercise
Symbol verification
What must the print quality of a barcode guarantee?
- That it passes verification (grading) under ISO/IEC 15416 for linear symbols
- That the barcode is aesthetically symmetrical
- That the barcode includes the selling price
What is a barcode verifier?
- A device that measures and grades the quality of the printed symbol according to a standard
- An app that looks up the product's price
- The staff who validate the labelling on the line
Related lessons
Reading is free. When you sign up, you also:
- You save your progress and pick up where you left off
- You take the exams, marked straight away
- You receive a completion record, with your name, for each course you finish
- You ask and answer in the Community (in Spanish)
- You get the PRO level by adding your products
- With PRO, you unlock the advanced tools: labels, GS1-128 and SSCC
Unlock PRO tools and completion records Free. The team reviews every application.
Already have access?Mark this lesson as read in My academy
This lesson is part of the course GS1 and Regulatory Labelling, from the Barcode and Traceability Academy.
This module includes the exam “Module 3 exam: Labelling and regulations”.
Next lesson Setting up labelling quality control in your factory 1 lesson left in the course